Showing posts with label Homemade. Show all posts

Saturday, March 23, 2013

Recipe Week: Chicken Spaghetti


Another Pioneer Woman recipe that makes us drool.  Go to her website for the picture tutorial of this recipe.  I think I'll make this for dinner tomorrow night.  Dan gets back tonight (actually early tomorrow morning, 2:30am, because of current flight delays in Denver).  He has been gone wince Wednesday 8am.  Four long days without him.  He will need a nice filling home-cooked meal when he gets home and this recipe fits the bill.  

And this wraps up my recipe week.  At some point before my kids leave home for college (yeah, I do have a little while), I'd like to make them each a small cookbook with all the recipes I make for lunch and dinner, breakfasts, breads and desserts, and snacks on a regular basis.  So they have all their familiar foods and how to make them organized in a nice little book.
  • 2 cups Cooked Chicken, shredded
  • 3 cups Dry Spaghetti, Broken Into Two Inch Pieces
  • 2 cans Cream Of Mushroom Soup
  • 2 cups Grated Sharp Cheddar Cheese
  • 1/4 cup Finely Diced Green Pepper
  • 1/4 cup Finely Diced Onion
  • 1 jar (4 Ounce) Diced Pimentos, Drained
  • 2 cups Reserved Chicken Broth From Pot
  • 1 teaspoon Lawry's Seasoned Salt
  • 1/8 teaspoon (to 1/4 Teaspoon) Cayenne Pepper
  • Salt And Pepper, to taste
  • 1 cup Additional Grated Sharp Cheddar Cheese

Cook 1 cut up fryer and pick out the meat to make two cups. Cook spaghetti in same chicken broth until al dente. Do not overcook. When spaghetti is cooked, combine with remaining ingredients except additional 1 cup sharp cheddar.
Place mixture in casserole pan and top with remaining sharp cheddar. Bake at 350 degrees for 45 minutes until bubbly. (If the cheese on top starts to get too cooked, cover with foil).

Friday, March 22, 2013

Recipe Week: Stuffed Pasta Shells

This is definitely one of my all time favorite dinners.  It just has such a fresh taste.  That's a nice change of pace once in awhile in the middle of winter.  Filling the shells takes a little hands-on time, but it is well worth it.  We devour them!

12 oz. dried jumbo pasta shells (about 35)
3 T olive oil
1 1/2 lbs. ground beef
2 garlic cloves, peeled and crushed
2 (28) oz cans whole tomatoes
1 (15) oz carton whole milk ricotta cheese
1 1/3 cups grated or shredded Parmigiano-Reggiano cheese

Preheat oven to 350.  Cook pasta shells as directed on box.  Meanwhile in a large skillet heat 1 T olive oil.  Add beef and 1 garlic clove.  Season with salt and pepper.  Cook until no pink remains and transfer to bowl, set aside.  For tomatoe sauce, in a second skillet, over low heat, combine remaining olive oil, remaining garlic, and undrained tomatoes.  Bring to a simmer and cook for 15-20 minutes, until somewhat thickened, breaking up the tomatoes with the back of a spoon.  Stir 1 1/2 cups of tomato mixture into ground beef, add ricotta and 2/3 cup of cheese.  Stir until combined.  Spoon 1 1/2 cups tomato sauce into 3-quart casserole dish.  Fill each pasta shell with about 1 T of meat and cheese mixture.  Arrange shells in baking dish.  Spoon remaining tomato sauce over shells and sprinkle with remaining 2/3 cup cheese.  Bake for 30 minutes.

Thursday, March 21, 2013

Recipe Week: BBQ Comfort Meatballs


This, is absolutely delish.  I haven't been able to make it in quite awhile.  Ever since Henry established a monopoly on my hands, I haven't been able to tackle many recipes that require 2 hands.  Hence meatballs have been put on the back burner.  But they will be back.  You can mark my word.  This recipe I got from my Pioneer Woman cookbook but it is also on her website so head over there, look at all of her beautiful pictures she took while making these meatballs, and try some of her other recipes.  Haven't tried one we haven't loved.
  • MEATBALLS
  • 1 1/2 pound Ground Beef
  • 3/4 cups Oats
  • 1 cup Milk
  • 3 T Very Finely Minced Onion
  • 1 1/2 t Salt
  • Plenty Of Ground Black Pepper, to taste

  • FOR COOKING MEATBALLS
  • 1 cup Flour (coating For Frozen Meatballs)
  • Cooking Oil

  • SAUCE
  • 1 cup Ketchup
  • 2 T Sugar
  • 3 T Vinegar
  • 2 T Worcestershire
  • 4-6 T Onion

  • Combine all meatball ingredients.  Roll into medium-small balls and place on a cookie sheet. Place sheet in freezer for five minutes.  After 5 minutes, remove meatballs from freezer and immediately dredge in unseasoned flour.  Brown meatballs in canola oil until just brown.  Place into a baking dish.  Combine all sauce ingredients.  Pour over meatballs and bake at 350 degrees for 45 minutes.

Wednesday, March 20, 2013

Recipe Week: Chicken Enchilada Bake

I tore this one out of a magazine a year or two ago because most all of the ingredients are things I have on hand all of the time. I like that about new recipes. Making new combinations of the things I already have in my pantry or freezer. I'm also a big fan of 1 dish meals/casseroles. With 3 very distracting and needy little people hovering around me daily, especially between the hours do 3 and 5, I love dumping the ingredients together and throwing it in the oven. Done. I love this dish and if you like cilantro then you will too!

 Salt and pepper to taste
1 lb boneless, skinless chicken
3 T olive oil
1 large onion, chopped
2 cloves garlic, finely chopped
1 green bell pepper, thinly sliced
2 bell peppers, orange and yellow, thinly sliced
1 cup frozen corn
1/2 cup sour cream
2 T lime juice
1 cup fresh cilantro (if you use dry, just use about half as much)
4 oz pepper jack cheese, shredded (1 cup)
8 sheets fillo dough, thawed

 Heat oven to 425. Boil chicken, let cool, and shred. Heat 2 T oil in a large skillet over medium heat. Add onion and 1/4 tsp each salt and pepper and cook, covered, stirring occasionally for 5 minutes. Add garlic and peppers and cook, covered, stirring occasionally, until just tender. Stir in the corn, sour cream, and lime juice. Fold in the chicken, cilantro, and cheese. Transfer for a 2 quart casserole dish. Scrunch sheets of fillo dough loosely and place on top of chicken mixture. Bake until golden brown, 12-15 minutes.

Tuesday, March 19, 2013

Recipe Week: Corn and Potato Chowder

I make a lot of chili and soups and stews in the wintertime. We usually top them all off with a little sour cream and shredded cheese and a side of bread. This chowder recipe is one of our favorites that I make all of the time. It's actually what's for dinner tonight!

2 T butter
1 large onion, finely chopped
1 celery stalk, finely chopped
7 cups chicken stock
1 1/2 cup frozen corn
4 medium potatoes, diced
1 cup heavy cream
3 T flour
Black pepper to taste

Melt the butter in a large sauce pan or medium soup pot. Stir in the onion and celery. Cook until the onion and celery are soft. Add the chicken stock, corn and potato. Being to a boil. Reduce heat, cover pot and simmer until potatoes are tender, about 7 minutes. I a small bowl whisk together the cream and flour. Stir the mixture into the soup and add the pepper. Being the soup back to a boil, reduce heat, and simmer for about 8 minutes.

Monday, March 18, 2013

Recipe Week: Poppyseed Chicken

This whole week I'll be posting some of our favorite dinner recipes that the whole family likes. This first one came from a friend of mine about 5 years ago and I have been making it religiously ever since. See my notes at the bottom of the recipe for changes that I have made.

4 boneless skinless chicken breasts
1 can cream of chicken soup
1/2 cup milk
1/2 cup sour cream

Topping:
1 T poppy seeds
1 1/2 cups Ritz crackers, crumbled
1 stick butter, melted

Boil chicken for 15 minutes. Place chicken in baking dish. Mix soup, milk, and sour cream and pour over chicken. Mix melted butter, crumbled crackers, and poppyseeds. Sprinkle over chicken.

Bake at 350 for about 30 minutes.

**We like this dish with a side of mashed potatoes and green beans**

NOTES:

I don't buy chicken breasts so I used a whole chicken. I boil the whole chicken, shred the meat, and place the shredded chicken in the baking dish. I then pour on the toppings as directed.

As for the Cream of Chicken soup, I can't encourage the use of Campbell's soups since they are full of chemicals (blech), but I also know its sometimes hard to make your own cream of anything soup. I found a Cream of Chicken soup made by Pacific Foods that is organic and all natural. It also comes in a tetra-pak box so no worries about a BPA lined can.

Although, even I would admit that the Ritz crackers taste the best in this recipe, any plain butter type cracker would work.

Lastly, I cut down the amount of butter to 3/4 of a stick instead of a whole stick and that much butter worked just as well

Friday, February 22, 2013

Storing Food for the Winter

Every summer we preserve food from our garden, the farmers market, and local fruit farms to eat during the winter. We try to eat seasonally, so no fresh strawberries in February for us, but we still enjoy the nutrients of strawberries throughout the winter in smoothies and over oatmeal.

Each summer it's always a guess at how much of each fruit and vegetable to put up. Keeping a record of the previous year helps by giving me a place to start from and then I either do more or less of the food based on if we ran out early or had extra left over at the beginning of the next season. This coming summer I am planning on doing more of about everything...little boys eat a lot...A LOT!

Here is our 2012 pantry.

Asparagus - 10 quarts frozen

Strawberries - 34 pints frozen

Blueberries - (2) 10# boxes frozen

Tart cherries - 5 pints frozen

Peaches - 25 pints plus 3 quarts canned and 1 quart frozen

Peach Jam - 11.5 jelly jars canned

Raspberry Jam - 5 jelly jars + 1 pint canned

Pears - 18 pints canned

Corn - 30 pints frozen

Apples - 1 pint + 4 jelly jars of apple butter and 8 quarts crock pot applesauce canned

Tomatoes - Whole, 40 quarts + 1 pint canned

Dill Pickles - 7 pints canned

Sweet Pickles- 4 pints canned

Relish - 7 pints canned

Carrots - Lots and lots and lots stored in a cool dry place

Salsa - 30 pints canned

Peppers - 14 pints green peppers frozen + 7 quarts colored peppers frozen

Thursday, February 21, 2013

Homemade Spice Mixes

For the past few years I have been making my own seasoning blends and keeping them on hand for when I need them in recipes. I make a large quantity at once and use a small amount so it lasts quite a long time. This way it becomes just as much of a convenience item as a packet of Lipton onion soup mix or Ortega taco seasoning mix; which is what I had used in the past. These blends also leave out all the MSG and other yucky ingredients, and I'm sure they are much lower in sodium.

Here are the 3 blends I make and use. All of them fit nicely in a pint sized mason jar for storage.

Taco Seasoning Mix

  • 12 T Chili Powder
  • 1 T Garlic Powder
  • 1 T Onion Powder
  • 1 T Crushed Red Pepper Flakes
  • 1 T Dried Oregano
  • 2 T Paprika
  • 6 T Cumin
  • 2 T Sea Salt
  • 3 T Black Pepper

Use 2 Tablespoons/1 pound of ground beef.


Onion Soup Mix

  • 1 1/3 cup Dried Minced Onion
  • 2 T Parsley Flakes
  • 4 t Onion Powder
  • 4 t Turmeric
  • 2 t Sea Salt
  • 2 t Sucanat
  • 1 t Black Pepper

Use 2-4 Tablespoons per recipe.


Chili Seasoning

  • 20 T Chili Powder
  • 5 t Paprika
  • 5 t Oregano
  • 5 t Cayenne Pepper
  • 5 t Cumin
  • 5 t Sea Salt
  • 5 t Black Pepper

Use 3 Tablespoons/1 pound of ground beef.

Friday, February 15, 2013

Homemade Fruit Snacks

We have a new favorite snack. They are easy to make, taste great, are virtually mess free, and are REALLY healthy! I'm really excited about these because they fit perfectly into our family's eating habits and health conscienceness. My cousin, Michelle, tried this recipe and told me how much her kids liked them and that I had to try them. So glad I did! I tweaked the recipe to make them a little less tart.

Only 4 ingredients:

1 cup Berries (strawberries, blueberries, or cherries), frozen or fresh
1/3 cup lemon juice
A generous squeeze from the honey jar
5 Tbsp. Gelatin

Measure the berries, lemon juice, and honey in a pot and heat until the berries are nice and soft. Pour into a blender (I use a magic bullet) and blend until smooth. Stop the blender and add the gelatin. Blend again and pour into a 8x8 or 9x9 pan. Put into the refrigerator to set and then cut into cubes. I store them in the fridge just because they taste good cold, but are very portable and do well out of the refrigerator too.

**A note about the gelatin. First be sure to use all 5 Tablespoons or the fruit snacks won't be the right texture. Also I use pure beef gelatin that I buy in bulk. It is a very healthy addition to your diet and your local health food store should carry a pound of it by the brand NOW. It can be ordered online too through Amazon. Beef gelatin is tasteless, odorless, and has lots of great health benefits.

This recipe could also probably be made using raspberries and blackberries. I will try that this summer when those berries are in season. A berry blend would probably also be great. How will you make yours? Be sure to let me know if you try a new combination that turns out extra yummy!


Friday, December 28, 2012

Newspaper Modge Podge Signs

I saw this tutorial on Pinterest awhile back and thought the signs were so cute and sounded easy enough to make.  They turned out good enough but I think I need a little more practice with modge podge.  I had some issues with the newspaper getting soggy from the modge podge and wrinkling.  I'm sure there is a solution to this but I never have figured it out.

Here are some basic instructions for making one but you may want to search around Pinterest for more a more detailed how-to.   

Rip or cut piece of newspaper out and modge podge to a piece of canvas.  Once that is dry, place re-stickable letter stickers on top spelling out whatever it is you want to spell out.  Now paint over the whole thing and once that is dry peel off the letters.  And you're done!

Saturday, December 22, 2012

Homemade Christmas Treats

We had a lot of reasons to bake this Christmas season.  I like to give gifts of sweets to teachers and neighbors.  Everyone likes baked goods and I like having a reason to do some mass baking.  This is the only time of year that I get to use butter and sugar by the pound!  We have dance teachers, a piano teachers, several teachers for Boothe's BSF class, several teachers for Magnolia's preschool, some neighbors and we had a cookie exchange at our church's annual Christmas brunch.

Here are the wonderful goodies that came out of my kitchen this year.

Picture from lilluna.com

Peanut Butter Cups
Picture by sixsistersstuff.com
Picture by culinaryconcoctionsbypeabody.com

Fannie Mae Fudge (My mom's recipe)

4 cups of Sugar
1 cup of Butter
1 teaspoon of Vanilla
1 cup of Milk
12 ounces of Semi-sweet Chocolate Chips
12 ounces Milk Chocolate Chips
25 large Marshmallows
1/4 cup of Cocoa
1/2 cup of Walnuts (optional)

Bring sugar, butter, vanilla and milk to a slow boil.  Continue to boil for 2 minutes.  Remove from heat and add chocolate chips, marshmallows, cocoa and walnuts.  Stir until creamy and pour on a large cookie sheet.


Friday, December 21, 2012

Christmas Decorations

This year while decorating the house for Christmas, I've been using a lot of natural or natural-like materials.  Pine cones, acorns, burlap, twine, and brown craft paper.  Here are some of the simple ways I have incorporated these around the house.

I kept the mantel plain this year.  Other years I have used a garland to add some Christmas cheer to the mantel but this year I went with a string of pine cones.
I strung the pine cones on a long piece of red and white bakers twine.  No sewing or gluing required.  I simply wrapped the twine around the upper part of each pine cone making sure it was hidden under the scales.  Then I left a short amount to space each of the cones and wrapped the twine around another one.  I repeated this until it was the length I needed.

I also used red ribbon with pine cones tying short lengths to each pine cone individually.  Then I grouped the ribbons together to form a cluster of cones and tied a bow at the top.  I thought it would be festive to hang these around the house.

My burlap wreath is a staple around my house.  It is just a foam wreath wrapped in burlap with a large burlap flower that I made a year or two ago.  I just add a bit of color to it to make it seasonal.
My centerpiece in the dining room this year used last year's spray painted and glittered pine cones in these star shaped baskets I found at Meijer during an after Christmas sale a few years ago.
I love using kraft paper to wrap gifts.  I did this last year too but dressed up the packages a little more this year.  Love how they turned out.  It's nice to use a paper that can be recycled when wrapping gifts.  I wish I could find a reusable option that I like.  That would be ideal.  I tried wrapping some gifts using fabric and the Japanese method of Furoshiki.  Ummm....I guess I'm not Japanese enough because I couldn't figure it out and they looked horrible!  It looks really simple and super cute, but it just wasn't happening.  Maybe by next year I will be able to find something better than kraft paper.
We made loaves of Snickerdoodle bread (highly recommend) for teachers this year and delivered them wrapped in freezer paper and tied up with baker's twine.  Simple yet beautiful.
I got a lot of use out of my red and white baker's twine this year!  In the fall, the girls and I collected a bag of acorns from around the neighborhood.  We hot glued small lengths of twine to each top to create a simple tree ornament or gift decoration.
Magnolia has also been crafting.  She made these cute ornaments using her new sewing machine that she got for her birthday.
I helped her just a smidge while she sewed.  She needed just a bit of help guiding the paper around the curves.  I made the bows for her and manned the hot glue gun but she placed the bows on the ornaments.
And lastly but most importantly our Nativity.  Boothe especially likes to play with the pieces and arrange them differently.  I like a child friendly, hands-on nativity set.  My kids learn so much more about the setting of the birth of Jesus when they can play with the pieces.  Both my girls are going to play angels in the live nativity scene at our church on Christmas Eve.

Thursday, December 20, 2012

Washi Tape Birdhouses

I get the creative bug during the day at home.  I love to make things...knitting, crafting, creativity...oooooh it makes me so happy.  The playroom in our house had a bare wall.  There is a bookshelf against the wall but nothing hung on the wall above it.  I had seen a picture of some washi tape birdhouses and painted birdhouses used to decorate (I think it was) a child's room.  Loved the idea so I set out to create an inexpensive wall display for their playroom.  I got some naked wood birdhouses at Micheal's.  I think they were about $5 each, not on sale and without a coupon.  I had a coupon so they ended up being even cheaper.  I had some leftover paint on hand but if you need paint Micheal's would have that too.  Micheal's does not have any washi tape or anything like washi tape so that I had to order online.  Etsy.com has a large selection of washi tapes from many different sellers.  The last supply I used was Modge Podge which also can be found at Micheal's.  Ok, so now that I have my supplies, here is what I did:

Step 1.  Paint the birdhouses.  Same color, different colors, different colors on the same birdhouse, what ever your creative little mind wants to do.  If you don't like how one turns out, paint over it!  Now wait for the paint to be completely dry.

Step 2.  Get creative with the washi tape.  Use as much or as little on each of the birdhouses as you like.  I wanted to use the decorative tape to give the birdhouses an outlined look.  The washi tape isn't super sticky and on the rough finish of the naked wood birdhouses it doesn't stick well at all.  So that's where the Modge Podge comes in...
\
Step 3.  Once you have all of the washi tape in place on the birdhouse go over the entire house with a layer of Modge Podge.  This will dry clear and set all the tape in place perfectly.
And now you're done!  Cute cute cute!  I never ended up hanging the houses on the wall where they were originally suppose to go.  I had them sitting on a deep window ledge in front of a window in the playroom and thought they looked so nice there, I couldn't move them.  Now I still need to hang something on that wall!

Sunday, December 16, 2012

Finger Knitting

Magnolia has been wanting to knit like I do for awhile now but I don't think she's coordinated to handle the yarn and 2 needles so I found a solution...finger knitting.  I found instructions on the internet and she took to it right away.  The only thing that can be made with this knitting technique is a chain so we've had to get creative thinking of useful things Magnolia can make.  Baby doll scarves, bracelets, belts and necklaces.  

Here are the steps with a few pictures for finger knitting.

1. Hold the tail with your thumb and lay yarn across you palm.
2. Weave yarn behind the pinky, in front of the ring finger, behind the middle finger and in front of the pointer finger.
3. Continue weaving all the way around the pointer finger and come around behind it, in front of the middle finger, behind the ring finger and in front of the pinky finger.
Your hand should now look like this.
4. Repeat steps 2 and 3 once more so your had looks like this.  You should have two loops of yarn around each finger, ending with the yarn connected to the ball of yarn over the pinky finger.  This end will need to be secured before going on to the next step.  Magnolia secures it be pinching the yarn between the back of her hand and her thigh.

5. Now it's time to "knit".  One each finger pull the lower loop over the top loop and off your finger.  Once you've done this to all of your fingers, each finger will now only have 1 loop left.  Now it's time to repeat step  2 and 3 so that each finger again has 2 loops.
Secure the end of the yarn once again and repeat step 5 over and over until the chain is as long as you'd like.


Once you are done and before removing the last loops from your fingers, cut the end of the yarn and weave it through the remaining loops still on your fingers.  This will secure the end so that the chain won't unravel once it's completely off your hand.  And that's it!  Fast, fun and a great activity for kids ages 5(ish)+.

These dolls are now ready for the winter temps ahead!

Sunday, December 2, 2012

Book Page Pumpkins

Our church had a salad luncheon and craft sale and I wanted to donate some things so I went in search of some cute easy fall crafts.  This book page pumpkin is what I came across and thought they were perfect!  I made 8 of them....here's what I did:
First rip off the cover, easy on the binding.  I used both paper backs and hard covers and both worked well.
Use a paper back cover and draw half of a pumpkin.  Cut it out keeping the edge that was along the binding straight.
Line up the straight edge of the half pumpkin cut-out along the binding of the book and trace around the edge of the cut-out.  Use scissors or an exacto knife to cut out a few pages at a time.  Each time retrace the half pumpkin shape onto the next set of pages to be cut out but be sure to cut them out just inside the traced line or the pumpkin shape will get progressively bigger and bigger.
Once the whole book has been cut out bend the book around and hot glue the binding together.  Once that dries try and fan out the pages a bit.  They won't be evenly spaced just try and separate any clumps.
Next put a decent sized glob of hot glue on the top center for the stem.  Dan cut up a thick stick from the yard into 1.5-2" pieces for me.  Place the stem and wait for it to dry. 
Then take the pumpkin outside to spray paint.  I held onto the stem to keep it from getting paint on it and lightly coated all around with the orange paint.  You can do more or less as you think looks nice.
Lastly tie on a green ribbon for the leaves.

I think this would be a fun way to make Christmas trees too and spray paint them with green!  Maybe I'll try it.  I still have 2 books left over.

Saturday, August 18, 2012

Homemade Liquid Hand Soap

Want to spend $5 on a gallon of quality hand soap?  Got 20 minutes?  I made this handsoap using the directions from this website.  I store it in a milk jug in the closet and refill the dispensers when I need to.  I would definitely recommend making it yourself.  Mine turned ut really well and you can't beat the cost savings!

Wednesday, August 15, 2012

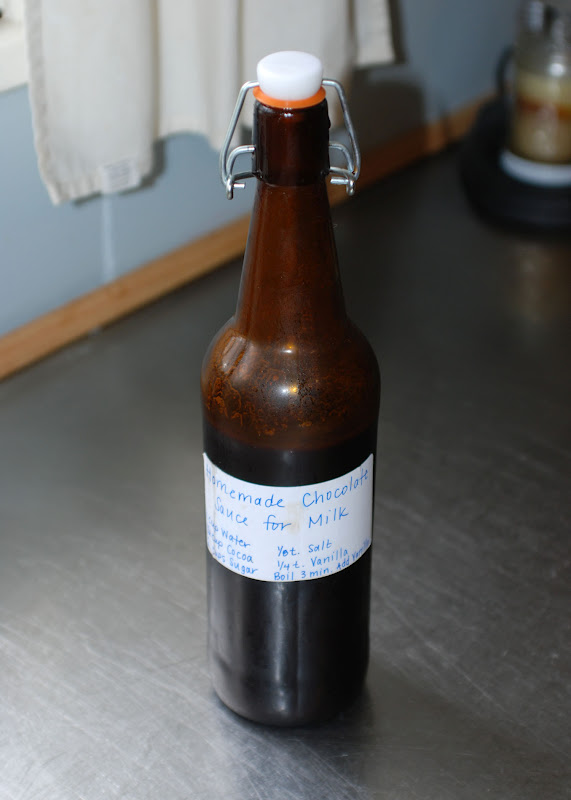
Homemade Chocolate Sauce

In my quest to make more things from scratch in the kitchen, I have mastered the chocolate sauce.  This makes for wonderful chocolate milk and we drizzle it over ice cream too.  It takes only about 5-10 minutes to make and lasts a few months.


You will need 1 cup water, 1/2 cup cocoa, 1 cup sugar, 1/4 t. vanilla and 1/8 t. salt.  Mix all ingredients except for the vanilla in a sauce pan.  Bring to a boil and boil for 3 minutes.  Remove from heat and add vanilla.  Once it cools down it thickens up to the consistency of Hershey's syrup.
That's it.  I keep mine in a bottle with an attached plug but any jar would work.  I also like to label my bottle with not only what's inside but the recipe too.  This way when I run out and need to make another batch, I don't have to dig around for the recipe, it's right there on the bottle.

Thursday, July 26, 2012

(Fake) Oatmeal Cookie Dough Bites

It's been forever since I've posted a recipe on here.  I struggle to keep up with just updates on the kids that the rest of the things I would like to blog about gets passed right up.  But these, THESE bites have been made so many times this summer that I had to take some pictures the other day.  I love these things and with a mad sweet tooth and 5 extra baby pounds holding on for dear life they have been a life saver.


Here are the usual suspects:
 Grind 1 1/3 cup each raw almonds, raw walnuts, raw rolled oats; 1/2 t. cinnamon and 1/4 t. sea salt.  It will turn into a coarse meal like this.
Next put the lid back on and stream in an almost full 1/2 cup of maple syrup.  A full half cup was a little much when I used that much.  Stir in a handful of dark chocolate chips.  Again don't use too many or the balls will be hard to roll.  Now grease up your hands and roll into ping-pong ball sized balls.  Store these in the refrigerator to firm up and keep.  Makes about 2 dozen.  You will be shocked at how good they are.  Your diet will thank me.